Hail damage to wood shake shingles can cause significant issues for homeowners, from leaking roofs to long-term structural damage. While wood shake shingles are known for their durability and rustic charm, they’re not immune to the devastating effects of hailstorms. However, the good news is that repairing this type of damage is manageable if you follow the right steps.
When it comes to dealing with hail damage, here are three things you should consider first:
- Safety comes first; inspect the damage only when it’s safe to do so.
- Quick action matters; timely repairs can prevent more significant structural concerns.
- Know when to call a professional; for more severe damage, expert assistance is key.
This guide outlines seven steps you can follow to repair hail damage to wood shake shingles, helping you keep your home safe, secure, and weatherproof.
Step 1: Inspect and Assess the Damage
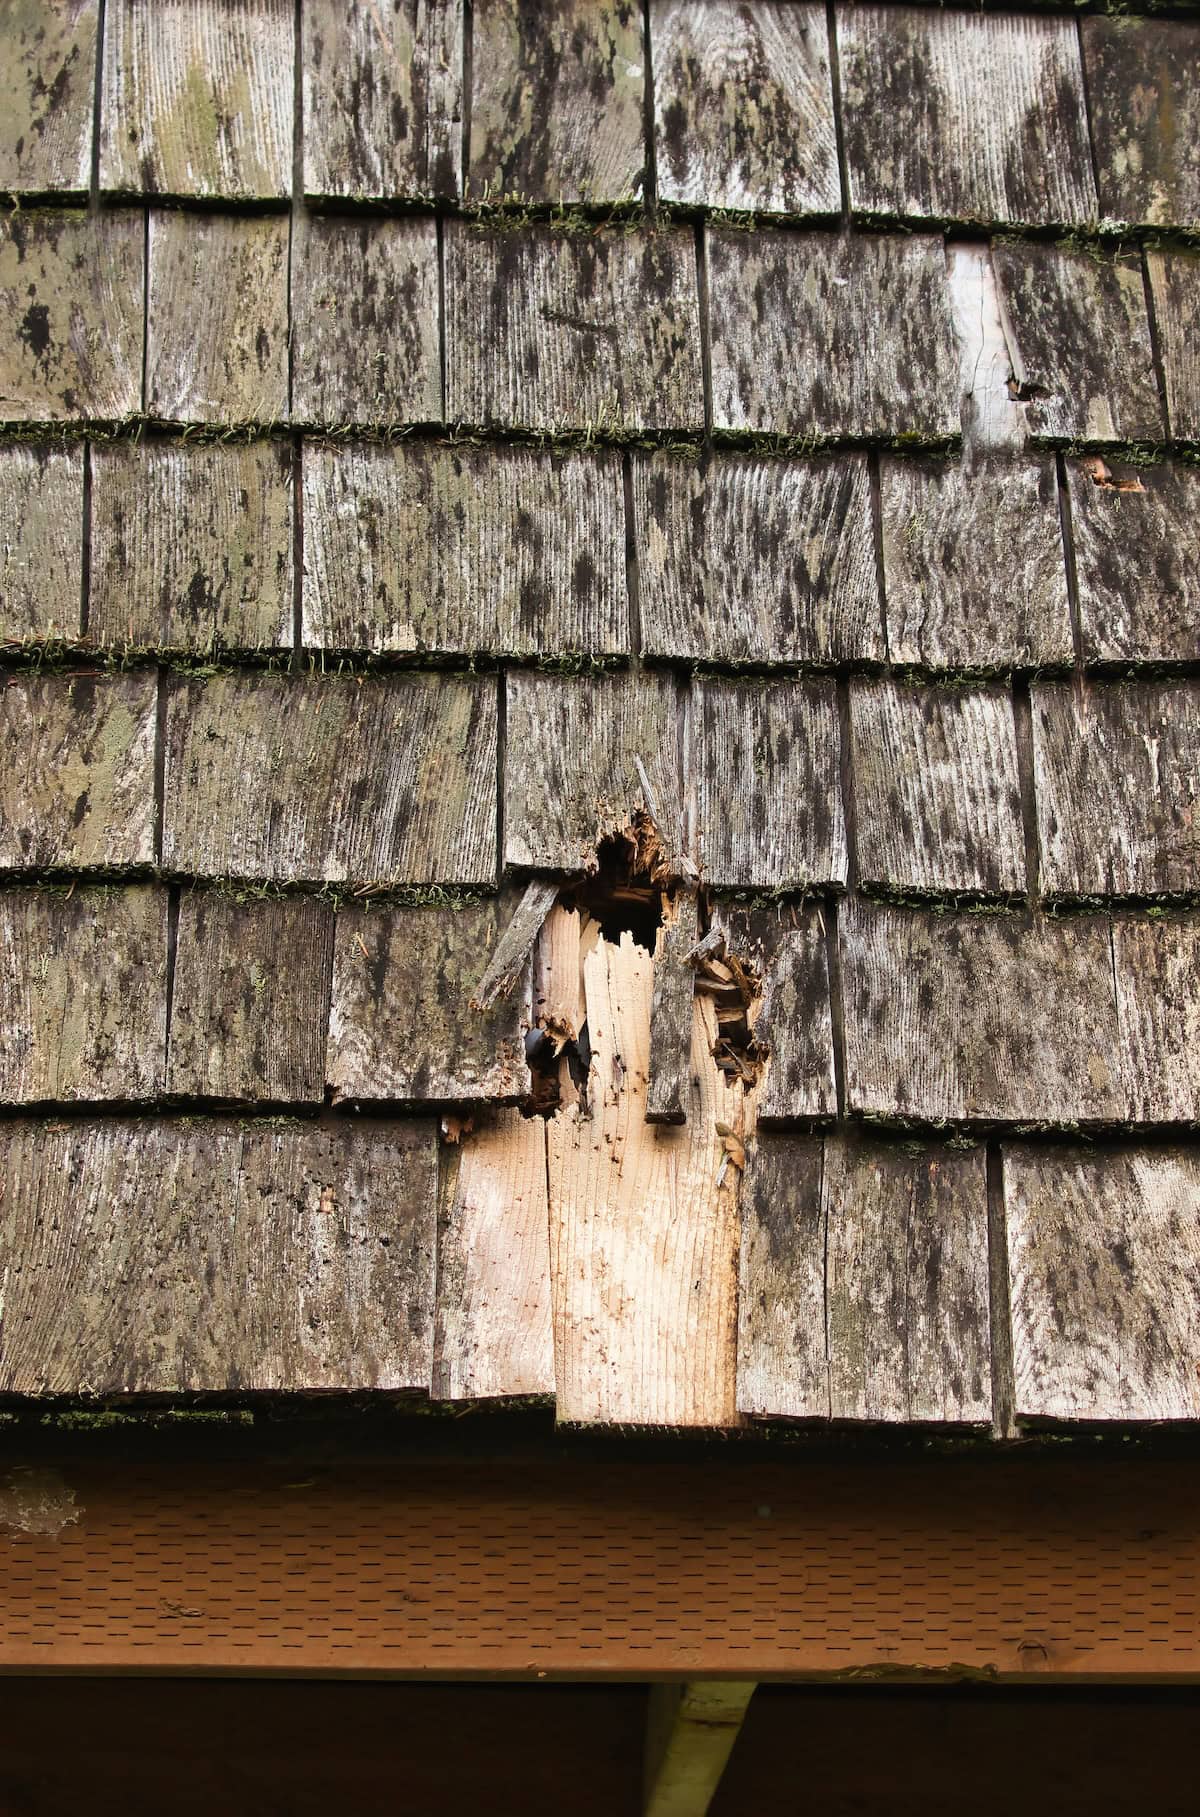
Identifying Hail Damage

Before you can repair, you must first understand the extent of the damage. Look for visible signs of hail damage, such as:
- Cracks or splits in the surface of the wood shake shingles
- Missing or displaced shingles
- Impact marks or dents on the roof
These signs will give you an idea of whether the damage is superficial, requires more extensive repairs, or even a full roof replacement because of hail damage. Be thorough and cautious during your inspections, especially when climbing a ladder to get a closer look.
Conducting a Full Roof Evaluation
Inspect not only the shingles but also the surrounding roof structure. When there’s hail damage to wood shake shingles — it can be due to leaks, weakened underlayment, or damaged flashing. A comprehensive examination ensures you don’t miss any hidden damage.
Step 2: Gather the Necessary Tools and Materials
What You’ll Need for Hail Damage to Wood Shake Shingles
To repair wood shake shingles that have been damaged by hail, you’ll need a few essential roofing tools and materials. These include:
- Replacement wood shake shingles: Be sure to purchase shingles that match the size, color, and material of your existing roof for a seamless repair.
- Hammer and nails: These will be needed to secure the new shingles in place after removing the damaged ones.
- Roofing adhesive/sealant: This will help ensure a strong bond between the new shingles and the roof, adding extra durability and weather resistance.
- Pry bar: A pry bar is essential for carefully lifting and removing the damaged shingles without causing further damage to the surrounding area.
- Roofing underlayment (if needed): In some cases, the underlayment beneath your shingles may also need to be replaced if it has been compromised during the hailstorm.
- Ladder and safety harness: A sturdy ladder will help you safely reach your roof, and a safety harness is crucial for keeping you secure while working at heights.
Having all the right tools and materials ready before beginning your project will make the repair process smoother, safer, and more efficient. Being well-prepared can save you time and prevent additional problems during the repair.
Ensuring Safety Gear
When it comes to working on roofs, in this case, hail damage to wood shake shingles, safety should always be your first priority. This is the most important thing that we, as roofing contractors, always have in mind, no matter what. Before you begin, make sure you have all the appropriate safety equipment to protect yourself while carrying out the repairs.
- Sturdy gloves: These are important for protecting your hands from sharp edges, nails, and splinters while handling shingles and tools.
- Helmet: A helmet will provide critical protection in case of falling debris, tools, or any unexpected accidents.
- Slip-resistant shoes: Proper footwear with good grip is essential for maintaining stability on potentially slippery or uneven roof surfaces.
- Secure safety harness: Using a safety harness is strongly recommended to prevent falls and ensure your safety while moving or working on the roof.
Taking these precautions will not only protect you but also give you the confidence to focus on the task at hand without risking injury. Remember, your safety is just as important as the successful completion of your roof repair project.
Step 3: Remove the Damaged Wood Shake Shingles

Carefully Pry Out the Shingles
Use your pry bar to gently lift the damaged shingles away from the roof. Be mindful not to cause further harm to surrounding shingles or the underlayment.
Clear the Area
Once the broken shingles have been removed, ensure the area is free from debris. Any leftover splinters or debris may affect the installation of new shingles or compromise the integrity of your roof.
Step 4. Replace the Hail-Damaged Shingles
Cutting and Fitting Replacement Shingles
Measure the space where the old shingle was removed. If the replacement shingle is not an exact size match, use a handsaw to trim it to fit perfectly within the gap.
Securing the New Shingles
Once the shingle fits correctly, secure it to the roof with nails and a slight layer of roofing adhesive. Be sure to position the nails properly, ensuring they sit flush with the surface to prevent water penetration.
Step 5. Seal and Waterproof the Repairs
Apply Roofing Sealant
After installing the shingles, use a quality roofing sealant to ensure the repair is watertight. Apply the sealant generously but evenly, focusing on cracks and areas where nails are visible.
Test for Watertight Seal
Once the sealant has dried, test your repair by lightly spraying water over the area to check if moisture seeps through. Proper sealing is crucial to prevent future leaks.

Step 6. Reinforce with Underlayment or Flashing
When is Underlayment Needed?
If the impact of the hail has compromised your roof’s underlayment, replace the damaged section with new material. This layer acts as an added line of defense against the elements.
Flashing Installations around Vulnerable Areas
Focus on vulnerable roof sections such as valleys, chimneys, and vents. New or repaired flashing ensures these areas remain airtight and shielded from future hailstorms.
Step 7. Conduct a Final Inspection and Routine Maintenance
Inspect Your Work
Once your shingles repairs are complete, inspect the area again to ensure every detail has been addressed. Pay attention to things like improperly aligned shingles or areas where the adhesive may have been applied unevenly.
Plan Routine Maintenance
Regularly clean and inspect your roof to keep it in top condition and avoid minor issues becoming major repair projects in the future. Proactive maintenance can significantly extend the life of your wood shake shingles.
Why Choose Montana Roofing Solutions for Hail Damage Repairs?
Ensuring your roof is in peak condition requires expertise, precision, and care. At Montana Roofing Solutions, we have years of experience helping homeowners tackle hail damage to wood shake shingles with confidence and ease. Whether it’s minor repairs or major replacements, our skilled roofing team has the tools and knowledge to get the job done right.
By choosing us, you’re guaranteed:
- Exceptional craftsmanship tailored to the specific needs of wood shake shingles
- Access to high-quality materials for durable, long-lasting repairs
- Trusted professionals who treat your home as if it were their own
Don’t leave your roof to chance. Reach out to Montana Roofing Solutions today for a free estimate and premium-grade repair services.